
Digital Shooting with Kodachrome and Velvia
August 28th, 2014by Gwyn Headley
Managing Director
Tags: film stock, Fuji Velvia, Kodachrome, ORWOChrom, Photoshop, plug-ins
Last night a brilliant idea came to me in my dreams. Why not program the CCD sensor in your camera to mimic the effect of your favourite film stock? (if you can remember what film was.)
As is often the case, someone else had not only had the same idea but had done something about it, and what’s more, many, many years ago and far more intelligently than me. Instead of the insanely complex reprogramming of hardware, people have created Photoshop plug-ins that can mimic the film stock of yesteryear. But by experimenting with the Channel Mixer settings, you can replicate these yourself.
Years ago I set the fotoLibra subscription level at £6 as month because that was the cost of a roll of Fuji Velvia, the finest film for recording buildings in the British countryside because it loved doing greys and greens. And that’s all I photographed really, because as you all know I am NOT a photographer, I am just a bloke with a camera.
If you went to a fairground, or visited New England in the fall, or went on a beach holiday, the Velvia would be useless. Instead you’d be taking boxes and boxes of Kodachrome, incomparable with reds and yellows and oranges.
And now there are plug-ins, or Actions, or Channel Mixer tips available for many of your favourite film stocks. To show you how they work, I’ve hacked a couple of my own images about. Criticism of my work is NOT solicited or even permitted; these are simply examples to show the effects these Channel Mixers can achieve.
I am awed by the quality of work produced by fotoLibra’s contributors, and I’m diffident about offering any hints or tips to you, but some of you may have forgotten these tricks and might enjoy playing with them.
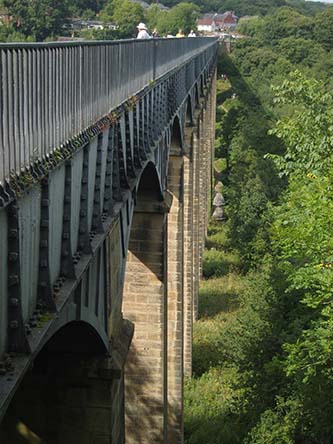
Original File

Velvia Effect

Kodachrome Effect
VELVIA EFFECT USING CHANNEL MIXERS
1. Layer> New Adjustment Layer> Channel Mixer> Click OK
2. Make these changes to each of the red, green, and blue sliders for each
output channel
3. These changes are guides which you can vary, but try and make sure the Total always = +100%Output Channel: Red
> Change Red Slider to: 141%
> Change Green Slider to: -20%
> Change Blue Slider to -21%Output Channel: Green
> Change Red Slider to: -21%
> Change Green Slider to: 144%
> Change Blue Slider to -20%Output Channel: Blue
> Change Red Slider to: -21%
> Change Green Slider to: -20%
> Change Blue Slider to 144%Original file

Velvia Effect

Kodachrome Effect

KODACHROME EFFECT USING CHANNEL MIXERS
1. Layer> New Adjustment Layer> Channel Mixer> Click OK
2. Make these changes to each of the red, green, and blue sliders for each
output channelOutput Channel: Red
> Change Red Slider to: 140%
> Change Green Slider to: -20%
> Change Blue Slider to -20%Output Channel: Green
> Change Red Slider to: 10%
> Change Green Slider to: 80%
> Change Blue Slider to 10%Output Channel: Blue
> Change Red Slider to: 0%
> Change Green Slider to: 0%
> Change Blue Slider to 100%
I don’t think anyone has managed an ORWOChrom effect yet but I will tell you the moment I hear about it.
The last time I had a brilliant idea in my dreams I briefly woke and wrote it down. When I awoke, the piece of paper by my bed read “Rubber Hammers”.

Aaaaaaaaaaah Film! Velvia & Kodachrome, two wonderful names from the past. Call me old fashioned but photography is not what it was. Digital has taken the ‘magic’ out of it.
I loved Velvia too. but my photography was an adjunct to my writing, and I made many costly mistakes which I can now overcome by taking 100 times as many pictures as I used to. And that would have cost me £18 each time, just for the Velvia stock!
Very interesting Gwyn. And yes I agree with you Paul.
However, my favourite stock was Kodak Triex 400asa.!
🙂
Much too fast for me! 50 ASA Velvia and a good tripod, the rain lashing across my face.
Alternatively, you can try DXO’s FilmPack (was available as a free download for a while, not sure if still there). Touch of a button and there’s a whole range of films to emulate, with simple slider adjustments to increase/decrease the effect
Thanks for the tip — I’m sure we’ll all have a look.
yes DXO’s FilmPack trial version is free for 30 days and they have some cool effects apart from kodachrome and velvia
I still bemoan the loss of Kodachrome 25! But my other favourites were Ilford Pan F (developed in Microphen) and Velvia 50 plus good old tri x.
I still have a Bronica 6×6 I use now and again.
And I guess you have to send away to get the film stock?
Good post, Gwyn, and don’t do your photography down! I’ve already shown this to a colleague who I am in continual dispute about applying the Velvia effect. My solution is much as described above. His solution is ‘boost saturation by ten percent. Or more if you can get away with it.” The results speak for themselves….
Very kind of you Peter, but I am fully aware of my limitations. Compare the results you get by boosting saturation and the slightly more time-consuming channel mixer process I describe. I think the results will be better.
Fuji X series cameras already have film simulation modes built in, including Velvia, Provia and Astia. You can also bracket to use all this modes in one shot. Very effective they are too
Fascinating. I didn’t know that. Do they only simulate Fuji films? I guess they wouldn’t want to be paying royalties to Kodak, Ilford, Agfa and the rest.
It’s a good tip i’ll use in the future.
Saludos
Another good way to get the Velvia look is to use Velvia!
Thanks for the tips, I shall have a ‘play’ although I did the freebie download of DXO. I was always a Fuji-fan, but appreciated Provia more. It didn’t leave people looking embarrassed while giving saturated colours. Nice shot – I was too vertically challenged to reach over the parapet far enough when I went there!
That’s interesting Gwyn, but why not try, if you are a ‘Lightroom’ user, processing an image using the adjustments you have outlined. Then save the result as a Lightroom preset. This can be done any number of times with the same image using the ‘Copy photo’ from the top menu. Give each new preset the name of the film type you are replicating. Apply your chosen ‘film’ preset to any image to give a starting point for further processing adjustments. It should save a lot of time as the primary settings for each film type are already within the ‘preset’. Of course, you’ll still need to work out the ‘look’ of the film you are replicating to begin with. I worked with film many years ago but moved with the times as digital came in. Digital can be magic too!
I’m old enough to remember Velvia being introduced as a film stock.
The old “rule” (or at least, suggestion bandied about by those who knew) was to rate it at 40 ASA (that’s how old I am) and not 50, to slightly under-expose it to bring out the tones a bit more on transparency film.
As a Lightroom user predominently, I’ve tried to find a good (accurate) preset for Velvia, as an editor I work with regularly asked for it. I have a feeling he though I was still shooting film stock.
But, the ones I’ve tired are either too biased to yellow and/or over-saturate the colours.
Marking it at 40 ASA would result in overexposure, which would make the colours more washed out.
I used to set my camera at 80 for Kodachrome 64. That was what National Geographic photographer did, and I wanted to be as cool as them.
Surely you mean ‘over expose’ Stephen. I couldn’t get on with Velvia at all until someone suggested cooking it longer, ie 40asa or even 32. At 50 I found everything was UNDER exposed. So it was always 40, then I began to get results.
I’ve used TLR Digital Velvia with Photoshop for some time now. As a free plug-in for PS Actions, it is infinitely adjustable and can give lovely results.
I’m always willing to try something new so I’ll take a look at the DXO Filmpack suggestion as well.
Oh, and for Black and white, Tri-x was tops at 400asa and Ilford FP4 at 125asa was excellent too.
Anyone ever try doing your own slide processing with Ferrovia(?)/3M home processing kit? Great fun!!
What I’d like to know is the opposite!
How to I make film scans look like digital files ie more natural.
Kodakchrome doesn’t scan well, Velvia is far too saturated and film generally has some cast or other usually magenta!
Digital is a dream come true, trouble is all my best stuff is on film!
You can obtain very good results in scanning kodachrome with a Nikon 9000ED. This scanner is discontinued but it’s possible to find on ebay.